


It’s almost impossible to be a software employee and escape markup languages like JSON and YAML. YAML, which stands for Yet Another Markup Language, or YAML Ain’t Markup Language is a human-readable text-based format for specifying configuration-type information. The human-readable feature that YAML has makes it almost perfect for dual human-machine use cases such as log files, configuration files, and in this case, also for Kubernetes configuration and definition files.
In this article, we’ll learn a bit about YAML and use it to define,first a Kubernetes Pod, a Kubernetes Deployment and then a Kubernetes service.
Prerequisites
If you want to follow up and fully grasp this article, I’m expecting you to have:
- Fundamental knowledge of docker containers and kubernetes.
- Visual studio code installed. Install the YAML extension from the marketplace.
- Docker desktop with kubernetes installed.
- Basic knowledge of the command line.
Understanding YAML.
YAML is relatively easy to learn, the two types of structures you need to know about are maps and lists.
YAML maps let you describe key-value pairs, which makes setting up configuration information suitable.
For example, you can have a YAML config file that explains maps like this:
Name: Bello
Title: Mister
From here, we have two values, Bello and Mister, mapped to two keys, Name and Title.
You can also specify more complex map structures by creating a key that maps to another map, rather than a value, example is:
Name: Bello
Title: Mister
School:
  Address: Oxford
  Faculty:
    Department: computer science
In this case, we have a key, School, who’s value is a map with 2 more keys, Address and Faculty. The Faculty key itself has a map as its value. You can nest as far as you want to as long as the key-value pairs are well indented.
YAML lists are a series of objects viewed as a unit. For example:
Name: Bello
Title: Mister
School:
  Address: Oxford
  Faculty:
    Department: computer Science
Family:
  Siblings:
    - name: Harry
      Title: mister
    - name: Esther
      Title: Miss
In the example above, we have a list of two items defined in our ‘Siblings’ key, each of which consists of a name and title.
That’s all you need to understand about YAML to get you up and running. We’re going to apply this knowledge about YAML and write kubernetes config files.
Kubernetes pod with YAML.
Creating a kubernetes pod is very straightforward , we would create the pod first and I’d explain what each key value pair means. To create a kubernetes you should:
- Create a folder called k8s.
- Open the folder on visual studio code and create a pod.yaml file.
Copy the code below and paste it in the pod.yaml file
apiVersion: v1
kind: Pod
metadata:
 name: first-pod
 labels:
   app: web
spec:
 containers:
   - name: front-end
   image: nginx
   ports:
     - containerPort: 80
Breaking the YAML file down, we start with the API version; here it’s v1. We specify that we want to create a Pod to hold our application and then the metadata. Here, we define the name of the Pod and the label we’ll use to identify the pod to Kubernetes.
Lastly, we configured the objects that make up the pod. The spec property includes any containers, and other information that Kubernetes needs to know about.
To verify that what we’ve done is valid, open the command prompt terminal (or the terminal in visual stuido code) and type kubectl create -f pod.yaml.
You should get a pod/first-pod created message if the command was successful. Now our pod is up and running and we can view the pod by typing kubectl get pods command in the terminal.
Open docker desktop, you should see the pod created. Click on the delete icon to delete the pod.
NOTE: If you get any "server error" message when you try to create a pod, make sure you open the docker desktop and certify that both the docker and kubernetes icons bottom left of the page are green.
Kubernetes deployment with YAML
A deployment is an object in Kubernetes that allows you manage a set of identical pods. With a deployment, you declare a single object in a YAML file. This object is accountable for creating the pods, making sure they are up to date, and certifying that the required number of replicas are running.
To create a deployment, open our k8s folder with visual studio code and create a new YAML file called deployment.yaml. Copy and paste the code below into the deployment.yaml file.
apiVersion: apps/v1
kind: Deployment
metadata:
  name: first-deployment
spec:
  replicas: 3
  selector:
    matchLabels:
      component: web
  template:
    metadata:
      labels:
        component: web
    spec:
      containers:
        - name: client
          image: nginx
          ports:
            - containerPort: 3000
The difference between creating a pod and a deployment is from line 5-13 in the code above. We have stated that the deployment always have 3 replicas. Next, we use a selector to tell the deployment which pods are part of the deployment. This essentially groups all the pods matching these labels in our deployment.
After that, we have the template object. When the deployment creates pods, it will create them using this template. Everything under the template key is identical to the pod specification we created earlier.
Now open the terminal and write the kubectl create -f deployment.yaml. You should have successfully created a deployment. You can get the deployments created by typing kubectl get deployments.
Deployments manages pods and specifies the number of pods that needs to be available at all times through the replicas key in the YAML file. The image below walks us through the process of creating a deployment, deleting a pod and the deployment creating a new pod to complete the replica set.
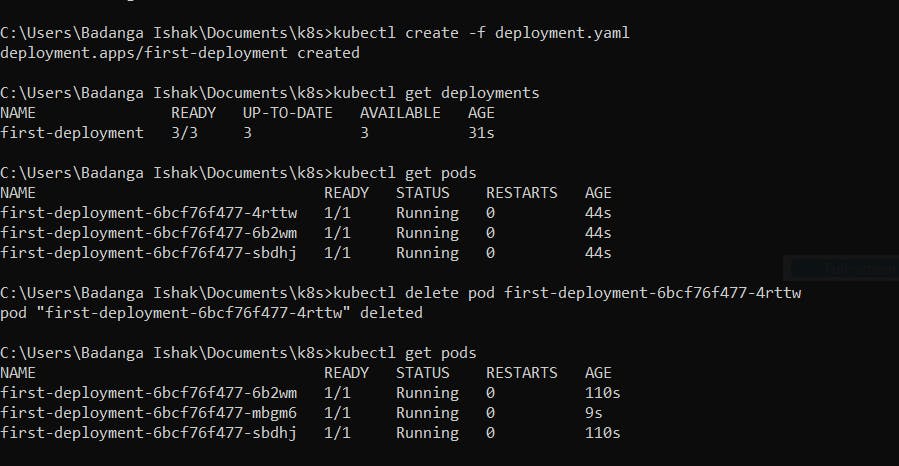
From the image, we created a kubernetes deployment and tried deleting a pod. Running the get pods command after deleting the pod shows that a new pod was created to meet the 3 replicas we specified in the YAML file.
Recap
So far, we have done the following
- Learn YAML using maps and lists.
- create a pod.
- create a deployment.
There’s a still lot more to learn about kubernetes (networking and security). I added some extra resources to get you up to speed on your journey to mastering kubernetes.